
ROOFING ARTICLES
Putting a Roof on a New Deck
The ceilings are going up, the doors going in. Let's show you what's happening here on this edition of forever home.
It's a windy, overcast day here in beautiful West Grove, Pennsylvania. You can see we've got our cathedral box, and up top German did a great job of framing around that. We have something for our J-channel to hit.
The guys have already got this soffit ceiling up on this side. We've got a channel out at the perimeter edge that will run up. The first phase is gonna run into that here on this side. We've just got a piece of aluminum cut and bent into place. Then the wall j channel, the wall, and materials will come up and button to the bottom, so we don't need to double up on the j channel on that end.
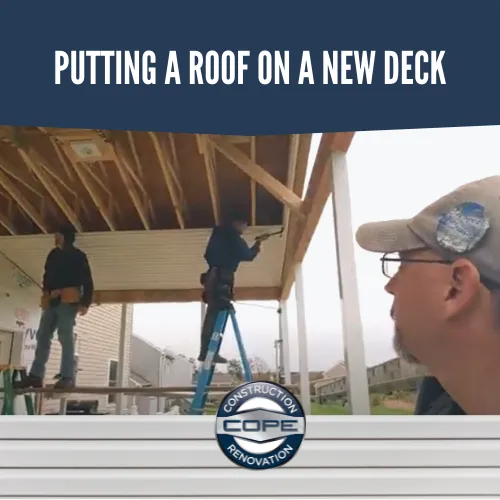
The guys are working on side number two. We'll wind up wrapping this brace here and some sort of a Zacher aluminum. I haven't heard what norm decided he would do on that particular piece.
We did pass our rough framing and electrical inspection. You see, we got our electrical set here. We've also got a piece over here on the other side. These are ready for our flood lamps to go in right here on the corner, and we had to go pick those up from the store and bring those back to get them in.
Meanwhile, north and working on the door, we reframe this opening a little bit bigger, but we've got room for a 36-inch door here. We've got the ice and water shield down at the bottom of our pan, just like we showed you. Another door, windows, and a new house wrap around this opening raft, and we are set to go on this.
Here's a view from the inside. While we had the exterior open, we could take and put our electric in on the inside for our switches and have the controls for the ceiling fan.
We had a challenge from the flooring crew that put the new flooring in.We had moved the vent out of the way of the door before the flooring guys came through. But then, apparently, they did not run their lumber to the wall. They stopped right here at the edge of the baseboard and plan on covering it with quarter round, which was great when they had this, you know, one-inch thick quarter.
But now that we've removed that and put a door in, that will cause some other challenges. We have to work out how we will hide that, so they had some here to hide things. And so we'll have to work that out over on the other side here. So once you guys get the roof here, we're gonna be ready to jump back to this wall and start bringing the siding back up on this and also on the gable end out here at the end of our trust.
One last thing has to take place. We've already got a rough electrical. We've got our coaxial cable in, and the customer has purchased a TV mount. Now we need to get a block up here.
Aluminum will give us a solid surface for mounting the wall mount to and a nice cap area that we can run our siding to and around nice, clean, and pretty. If we didn't put that mounting block out here and we just tried to screw this wall mount into the siding, we went up crushing it, and it would look horrendous.
We'll take and put a piece of wood block out here. Wrap that in aluminum, giving them something solid to screw that TV mount on. This is gonna look gorgeous and give you the angle from the underside.
As this is coming across, the next thing will happen once we eliminate Catherine here on this corner press. We need to get some on the other corner. But once that happens, we can come through and measure for our screen panels, and we'll get all of our widths together and the triangle shape up top here. Now we have the ventilated soffit back, allowing airflow into the roof and then up and out that vent on top.
That's gonna allow that roof deck to stay consistent temperature, which is important in two areas.
One, we don't want you baking from the top when you're in your screening room in the summertime, so we want to make sure that we get some air moving up there and the sections sitting over the living room.
Two, we don't want any condensation moisture buildup in that space or potential ice damming in the bottom. So we've got continuous fan and soffit all the way out to our continuous ridge vent at the top.
Now that that's been put in, the next step is for the guys to start bending L-shaped facia gapping. We're going to put that across the front edge all the way here. We can cap our rake boards, this beam, and a couple of other things that need to begin to get those dressings and treatments put on. We'll take down the pumpjack system at some point here because it will get in the way, but we want to get those facia boards on there first.
Read next post: Wrapping up the new Screened in Deck